
It is a specific folder structure with workflow. Tax folders are generated automatically every year.
Files that are uploaded must be in a certain format and include a personal number of an employee at the beginning. This way, the file is sent automatically to the correct employee only
Please note a TULIP setup you see always depends on custom requirements and access settings of TULIP for your company. Not all companies use the Tax documents distribution functionality.
Location
You can access payslips folders through Payroll Uploads directly for the current payroll run.
One or more tax documents per year for each employee.
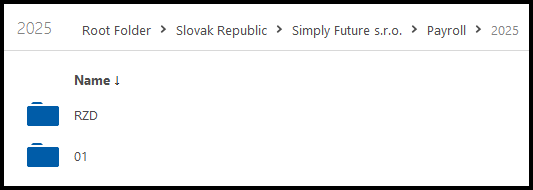
Root Folder » Client’s country » Client’s name » Payroll » Year » Tax folder name (for example “RZD”)
Tax Documents
For example, 1562 is a personal number of an employee, so the file´s name is:
1562-Annual_Tax_Reconciliation.pdf

Actions
- When you upload files into a Tax folder and press the Publish button, employees can see and download their files. An e-mail notification is sent to all selected employees.
- When you upload files directly into the Published subfolder, employees can see and download their files. An e-mail notification is NOT sent.
- You can delete any file and an e-mail notification is NOT sent. The file is just removed from employee´s documents.
Not allowed actions
A workflow is connected to each payroll folder, for this reason you cannot:
- change a name of the Payroll folder (you can rename only files inside)
- delete the Payroll folder or monthly subfolders (you can delete only files inside)
- create a subfolder in Payroll folder (you can only add files inside this folder)
Step 1 – Tile
Go to File Manager tile.
Step 2 – Folder
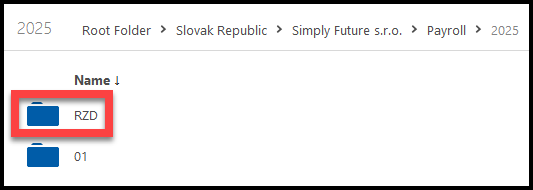
Follow the path as displayed in the picture: Root Folder » Client’s country » Client’s name » Payroll » Year » Tax Folder´s name
Step 3 – Add files
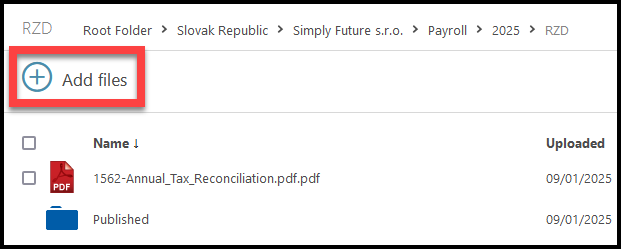
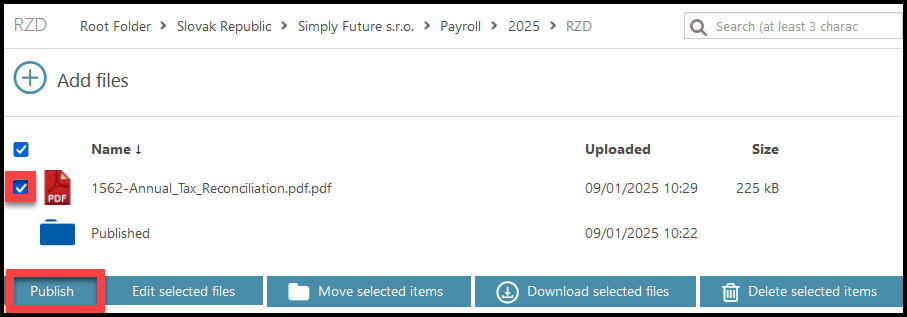
Inside the folder, click on the + Add files button.
- When you upload files into this folder, an e-mail notification will be sent to all selected employees.
- If you want to upload files without sending an e-mail notification, click on the Published subfolder to go inside it. Upload all files here directly.
Step 4 – File name & format
The file must be saved with a name in a certain format. This way TULIP can send the file to the correct employee.
Include a personal number of an employee at the beginning
- For example, 1562 is a personal number of an employee, so the file´s name is:
- 1562-Annual_Tax_Reconciliation.pdf

Also, after the personal number, an underscore, dot or hyphen must follow to separate the personal number from the rest of the file´s name.
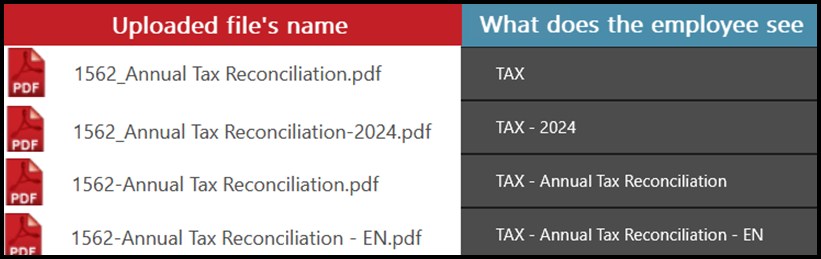
You can add other data into the file´s name but you must use the correct format. See the picture to see how does the employee see his/her documents in My Tax Documents tile.
Step 5 – Upload the file
Search folders in your PC to find the required files. Click Open.
The file is now uploaded to TULIP. Click on the checkbox on the left, next to the file´s name.
A few new buttons will display. Click the Publish button. Now the file is moved to a “Published” folder.
The files are available for the employee in his/her TULIP account.
Step 6 – Changes
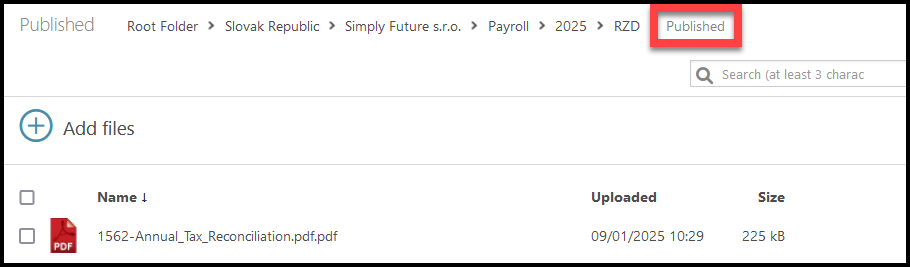
If you want to delete, edit, or move the uploaded file, go to the Published folder.
You can delete any file and an e-mail notification is NOT sent. The file is just removed from employee´s documents.