
Introduction
Users with HR Admin role may be able to add new employees into their company in TULIP, edit their data, send notifications to new users and add or remove access. It is possible to do so one by one or in bulk import (in this manual). In this manual we will take a look at:
Frequently asked questions
How to overwrite current employee data in TULIP via importing?
Here are the three general rules for importing data:
- Change data – type in any numbers or words – it will overwrite the old data.
- Keep the old data – leave the cell blank, no changes will be made.
- Delete data: manager / employment end – type in “NULL”, the current data will be deleted.
Can employees also be deleted by importing?
No, it is only possible to delete the termination of employment, not import an account deletion.
It is only possible to delete the Manager / already recorded Employment Termination Date – type “NULL” in the cell, and the original data will be deleted.
In case of End of employment import, the system checks if an employee has any attendance requests that overlap through this date. If there are requests after the End of employment date, the system will not allow you to terminate this employee. You must delete the request first.
Import new employees
Create multiple new profiles at once.
Step 1 – Location

Go to Admin tile.
Select Employees.
You can choose the Company and filters if needed. There are advanced filters hidden – click on the small arrow to display them. Then, click Apply filter.
Step 2 – Import employees
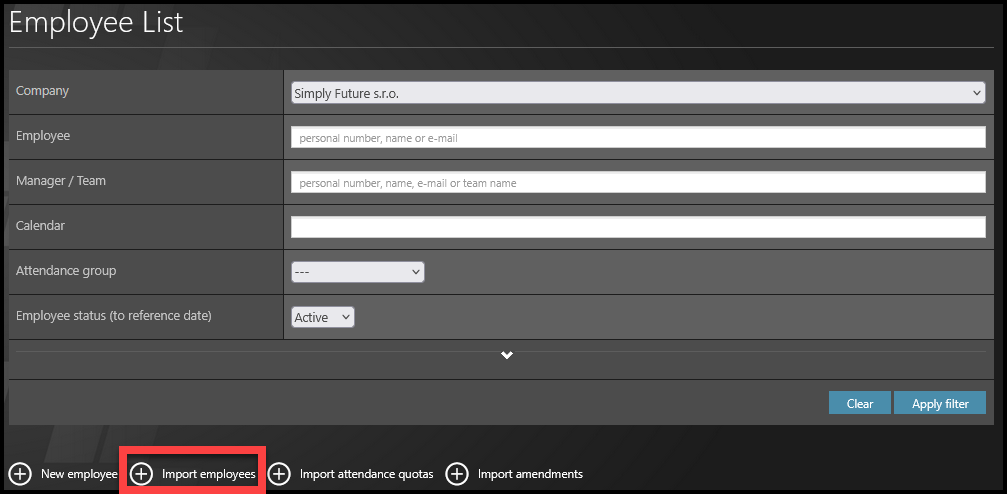
Click on Import employees button.
Step 3 – Download template
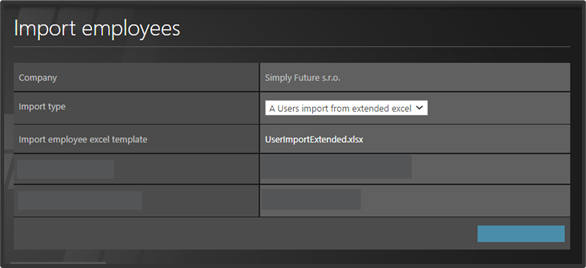
Choose the Import type:
- Users import from excel – basic import
- Users import from extended excel – includes additional and optional data, for example IBAN or Attendance group of the employee.
Click on UserImportExtended.xlsx (or similar name) to download the template.
Step 4 – Excel sheet

Open the downloaded file in your PC. Click Enable changes.
Fill in the Excel template: you must always fill in the fields in bold. However, if you track attendance, you must also fill in other fields related to attendance settings –
- Personal number – a unique code that represents the employee within a company.
- First name
- Last name
- Display name – (leave empty, Frist name + Last Name is used as display name automatically.)
- Gender
- Language – (leave empty, default lenguage is assinged automatically).
- Employment start – a mandatory field – dd.mm.yyyy format of date.
- Employment end – date format dd.mm.yyyy (if left blank, the default setting is indefinite period).
- Team leader – fill in the personal number of a manager. This person will approve employee’s attendance. (if you leave this field empty, all attendance requests employee creates are automatically approved).
- “Attendance group code” behaves differently in case of different setups: If the company has a default group and calendar, leaving the field blank allows the system to assign default group and calendar to employee/s. If you wish to assingn other group and calendar, you must write the code into the field. If the company does not have a default group and calendar, leaving the field blank does not assign any group and calendar.
- “Attendance calendar code” behaves differently in case of different setups: If the company has a default group and calendar, leaving the field blank allows the system to assign default group and calendar to employee/s. If you wish to assingn other group and calendar, you must write the code into the field. If the company does not have a default group and calendar, leaving the field blank does not assign any group and calendar.
- Valid from – the date from which the account will be active. No entries into previous days in attendance can be made for this account (if you leave this field empty, today´s date by default).
- Effective date – for applying access rights, changes in managers, attendance groups, attendance calendars (if you leave this field empty, it is automatically pre-filled as the same date as “Employment start”).
- Other & customer-specific fields.
Save the file in your PC.
Step 5 – Upload excel sheet
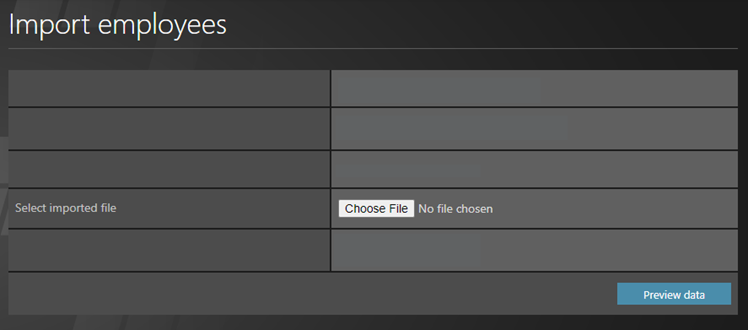
Open TULIP.
Click Choose file button.
Select the file from your PC.
Please be aware you cannot upload files with 0 size. If the file is blank, it will trigger an error.
After you upload a file, click Preview data to check and validate the data.
Step 6 – Orange rows (Error)
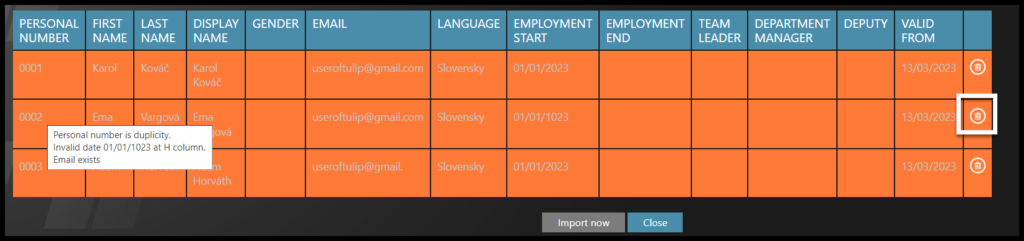
Any row with an orange color will trigger an error. You cannot import employees in orange rows.
Move your mouse over the highlighted rows. You will get an information specifying the incorrect data.
If there is an error, check for any typos. Make sure there are no additional blank spaces at the beginning or ends of words.
Now you have two options:
Delete the orange row and add the employee with an error later:
- First, click on the small bin icon on the right to delete the orangerow.
- Add rest of the employees to the system – click on Import now button.
- Add the employee with an error individually – see manual on how to add new users individually or import this employee only.
Correct the data in the excel sheet:
- Open the filled excel sheet in your PC.
- Correct the data that triggers an error.
- Upload the file once again into TULIP.
- Check all the data and click on Import now button.
Step 7 – Roles
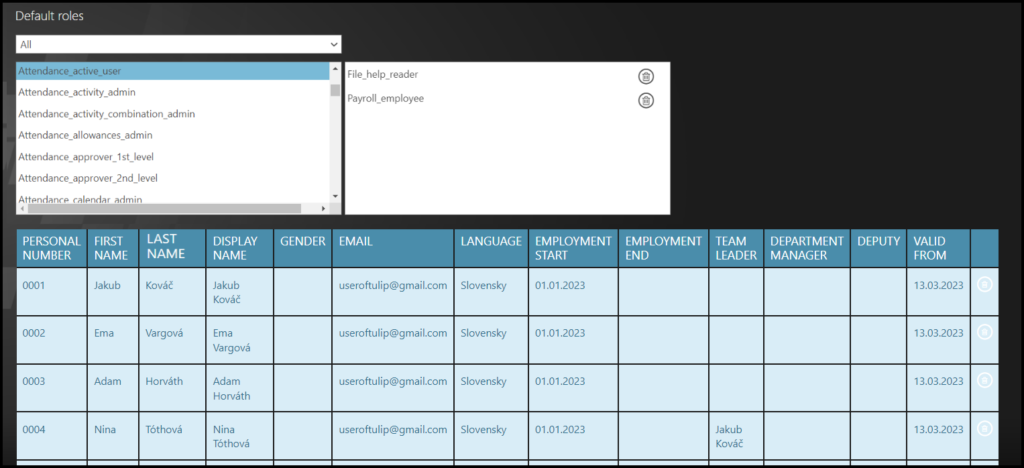
You can also see default roles, thatwill be automatically added to all imported employees.
Click Import now.
Now, you must send a welcome notification to employees individually or in bulk.
Step 8 – Send notifications

You can send notifications individually or in bulk:
Tick checkboxes next to employees´ names.
If you cannot find an employee/s, follow this manual.
Choose date and time of sending. If left empty, the notification will be sent immediately.
Click on Send notification to selected button.
If an employee uses an SSO, a single sign-on, no welcome notification is necessary to activate his/her account. However, if you send the notification, TULIP automatically recognizes it based on the login method of the company and sends a special kind of notification. Employee receives the informative e-mail and then, he/she can log in with a company e-mail/username and password. If you are unsure about how to log in if you are using SSO, please ask your HR.
Changes for current employees
Edit multiple new profiles at once.
Step 1 – Location
Go to Admin tile.
Select Employees.
You can choose the Company and filters if needed. There are advanced filters hidden – click on the small arrow to display them. Then, click Apply filter.
Step 2 – Import employees
Click on Import employees button.
Step 3 – Download template
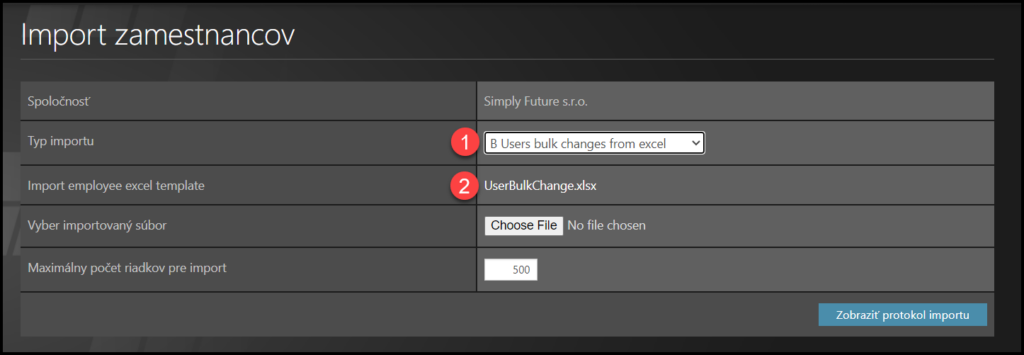
- Choose the Import type: Import changes to edit the managers, attendance settings or terminate employees in bulk.
- Click on the name of the template to download it.
Step 4 – Excel sheet
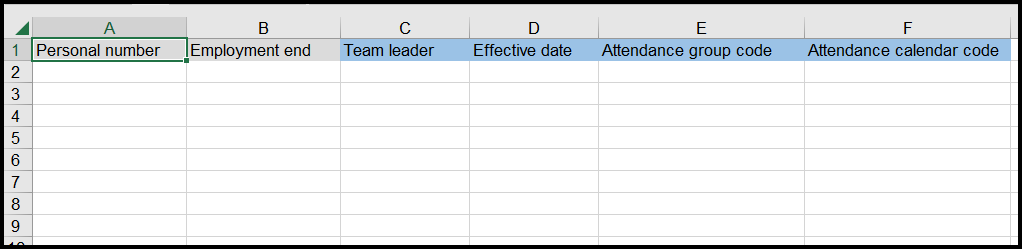
Open the downloaded file in your PC. Click Enable changes.
Fill in:
- The personal number of an employee – it is necessary in order to assign the change to the correct employee.
- Effective date of the change – Effective date applies to access rights, changes in managers, attendance groups, attendance calendars etc. (if you leave the field blank, the change is effective as of today by default.)
Three general rules for all other fields:
- Change data – type in any numbers or words – it will overwrite the old data.
- Delete the old data: manager / employment end – type in “NULL”, the current data will be deleted.
- Keep the old data – leave the cell blank, no changes will be made.
Save the file in your PC.
Step 5 – Upload excel sheet
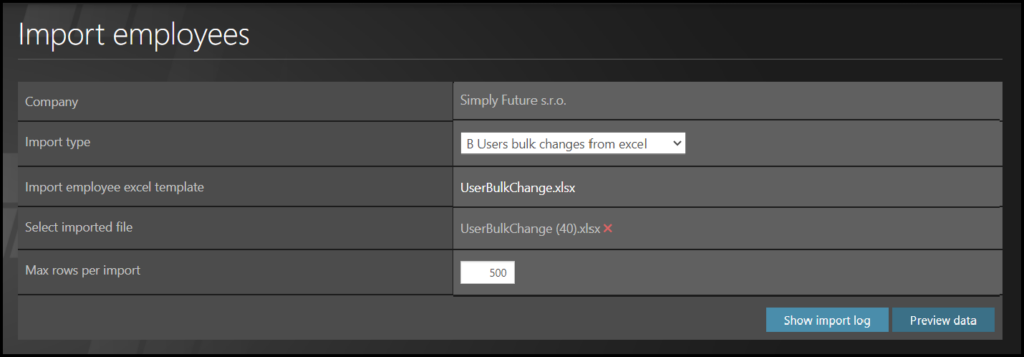
Open TULIP.
Click Choose file button.
Select the file from your PC.
Please be aware you cannot upload files with 0 size. If the file is blank, it will trigger an error.
After you upload a file, click Preview data to check and validate the data.
Step 6 – Orange rows (Error)
Any row with an orange color will trigger an error. You cannot import employees in orange rows.
Move your mouse over the highlighted rows. You will get an information specifying the incorrect data.
If there is an error, check for any typos. Make sure there are no additional blank spaces at the beginning or ends of words.
Now you have two options:
Delete the orange row and add the employee with an error later:
- First, click on the small bin icon on the right to delete the orangerow.
- Add rest of the employees to the system – click on Import now button.
- Add the employee with an error individually – import employee individually via excel sheet.
Correct the data in the excel sheet:
- Open the filled excel sheet in your PC.
- Correct the data that triggers an error.
- Upload the file once again into TULIP.
- Check all the data and click on Import now button.
Click Import now.