
Introduction
Administrators can create attendance calendars or assign attendance calendars to employees. Changes to calendars are generally possible only for open attendance periods from the past 1-2 months and not for periods processed by payroll.
There are 4 ways to add a calendar to an employee:
A) For a new employee, manually create the employee´s account and then set up their calendar as detailed in this manual.
B) For an existing employee, manually change their calendar individually as shown in this manual.
C) For multiple new employees, import them into TULIP to create their accounts while also using the “Calendar code” column in the import sheet.
D) For multiple existing employees, use a the option to edit their calendars in bulk via import of changes by using the “Calendar code” column in the import sheet.
E) Some clients use a “Default Calendar” setup, where all new employees automatically receive a default calendar, set up by TULIP Administrators. This setting applies to both individual creations and bulk imports.
Please note a TULIP setup you see always depends on custom requirements and access settings of TULIP for your company. Not all companies use this functionality.
Frequently asked questions
I cannot find the employee I am looking for. Where do I find all employees?
Click on the arrow icon (advanced filter selection). Then, change the option “Employee status (to reference date)” to “inactive”.
How to change a default calendar?
TULIP administrators can set up or change “Default calendar” for your company. You can edit assigned calendars:
For existing employees: individually (in this manual) & in bulk via import of changes. Insert the desired calendar/calendar code and save the change.
For new employees: individually (in this manual) & in bulk (in case that the “Default calendar” is set up in your company) when you are adding new employees via bulk import, leave the “Calendar code” blank for employees that should receive the default calendar. For employees with different calendars, type the desired calendar code in the “Calendar code” column – this way, the default calendar will not be assigned.
Steps
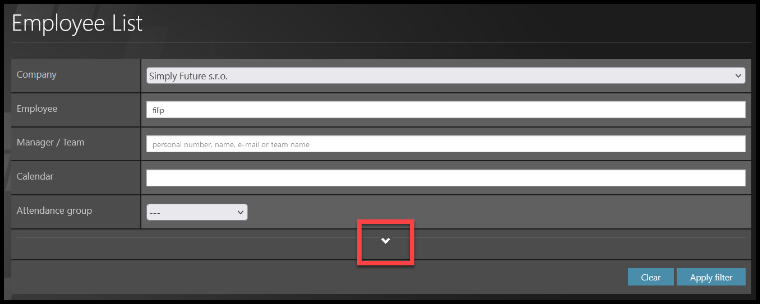
Step 1 – Location

Go to Admin tile.
Select Employees.
You can choose the Company and filters if needed. There are advanced filters hidden – click on the small arrow to display them. Then, click Apply filter.
Step 2 – Pencil – Employee settings
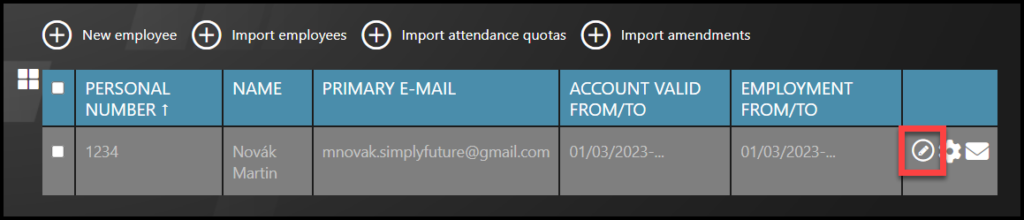
Select the employee – Click on the pencil icon.
If you cannot find an employee/s, follow this manual.
Step 3 – Employee edit
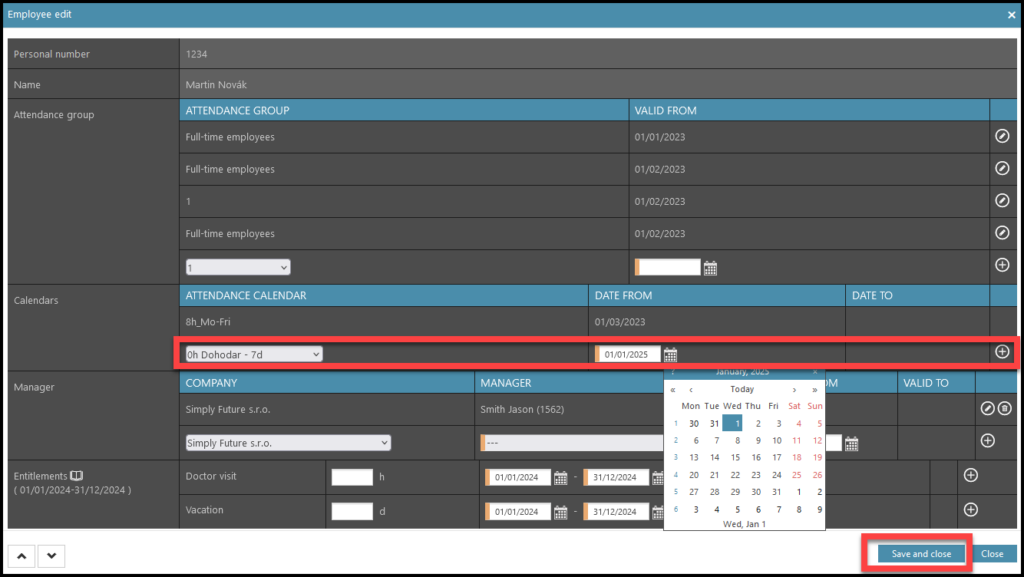
Select the Attendance calendar.
Set up the date – Date from.
Click on the plus button. This confirms your input. Once you are done with editing, click Save and close.
Step 5 – Editing

Add a calendar with a “Date from” date before the current one. It will be added chronologically.
If you change calendar this way, please be aware all following calendars will be deleted for the employee.
Then click Save and close.

It is not possible to delete calendars, but you can edit them – use the pencil icon, or add a new one with the plus button.
Then click Save and close.
To keep the old data – click Close, no changes will be made.