
Introduction
As an employee who returned from a Business trip, you must create your own business trip settlement. The settlement form enables you to edit the plan to the reality of your trip. According to the current legislation, the employee is obliged to fill in the settlement form within 10 business days after the end of the trip. If this process is finally completed by the 25th of the month, you receive the money in the salary for the given month.
In the settlement form, you can:
✔ note all countries, vehicles, meals and the fees for all of them
✔ confirm the advance payment (if you received a certain amount of money before the trip)
✔ attach all bills, tickets, and other documents as a confirmation of payments you made
✔ create a draft of a settlement, save it for yourself and come back to editing later. Anytime during filling in the form, you can save the form and then return to continue via My Tasks tile. Once you send it for approval, it becomes locked.
Please note a TULIP setup you see always depends on custom requirements and access settings of TULIP for your company. Not all companies use the Business Trips functionality.
Frequently asked questions
I cannot create a Business trip settlement.
If you requested advance payment, the system will check if it was paid or not. If it was not confirmed by a treasurer, the system will not allow you to send the settlement for approval. Contact your treasurer – if possible, create a Hotline request.
Is a Business trip during weekend / bank holiday / other days without working shift possible?
Usually, employees can create trips only for days where there is already a planned working shift. In some cases, it is possible to enable business trips for other days (for example, weekends). In this case, create an attendance request for overtime work on that day.
My Business trip lasts over the month end, how should I close my attendance?
If your business trip overlaps two or more months (It means that the trip starts in one month and finishes in another), close your attendance period for the finishing month while the business trip settlement form is still open for editing.
Steps
There are usually six individual tabs that you must fill in. We will go through every single one of them:

- Crossing borders
- Meals
- Costs
- Compensation of fuel
- Attachments
- Result of settlement tab
Step 1 – Tile
Go to My tasks tile
Step 2 – My Tasks
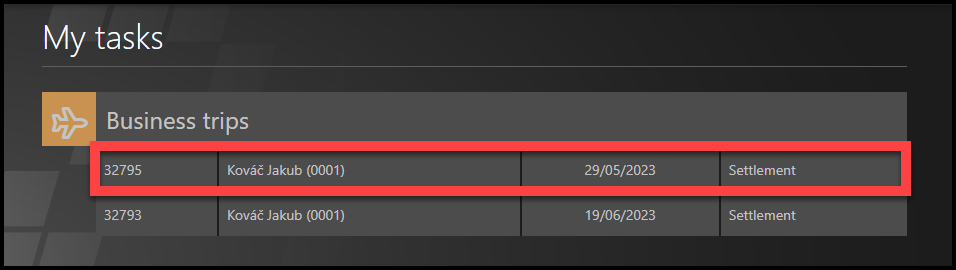
Click on the business trip settlement.
Step 3 – Plan
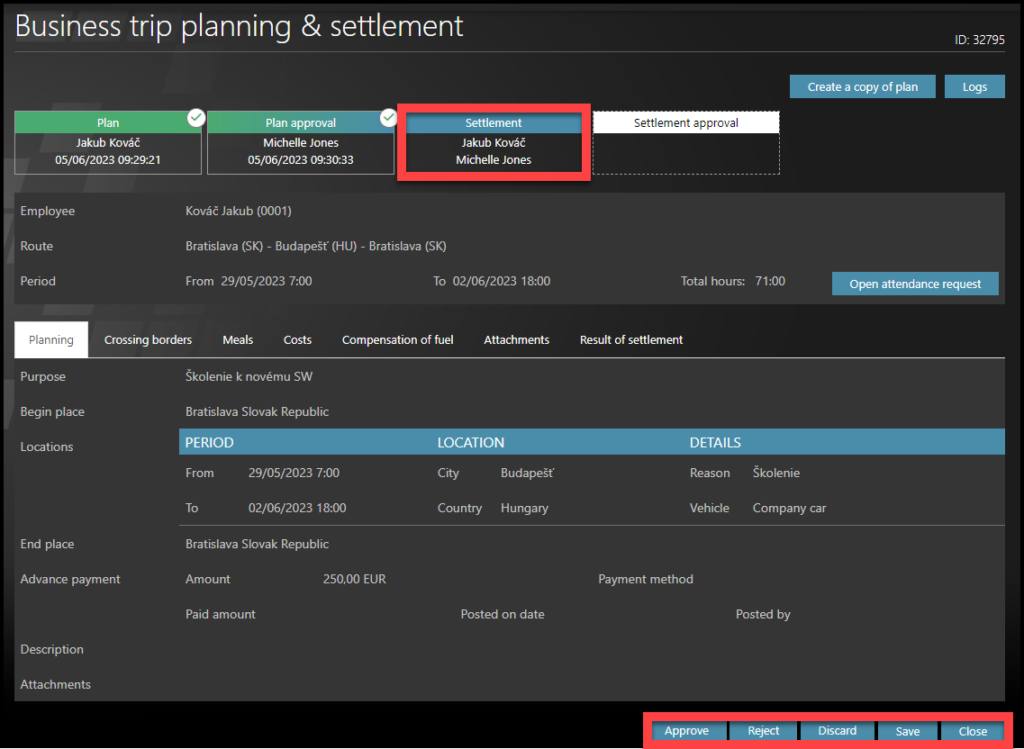
Let´s fill in the individual tabs starting with Plan.
If you need to change something in the plan, click Reject, and give a reason.
The settlement will then revert back to the planning state and you can make the changes.
Notes:
Save the form regularly so you don’t lose any information.
The system will help you with all the calculations, but it is up to you to enter all the required information and payment confirmations.
If you have any doubts or questions, contact your manager or accounting department.
Crossing borders
Step 4 – Countries
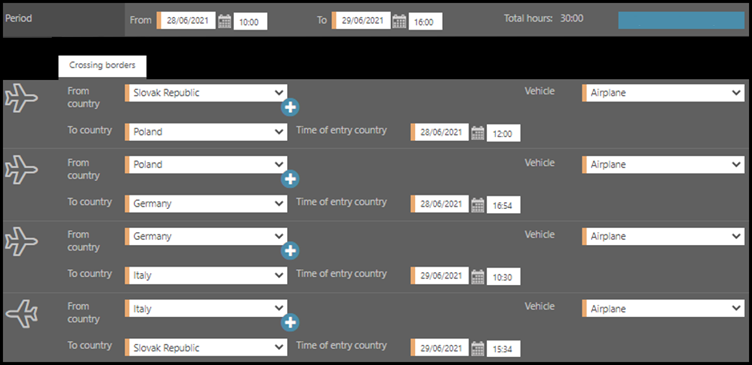
The Crossing borders tab is displayed first by default.
Here you will fill in the details for all visited countries:
- From country – submit the country from which you travel
- To country – submit the destination to which you travel and cross its border
- Time of entry country – enter the time of crossing the border by vehicle or time of landing the plane in the destination
- Vehicle – choose the means of transport on this way
Fill in the data for all visited countries:
- From starting place to destination
- From destination to a second destination: This is optional. Use this option in case you travel to more than just one destination. Click on a plus sign to add a new line to the form. Start and End dates must cover the whole trip duration, leaving no gaps.
- From destination back to starting place
Meals
Step 5 – Meals paid
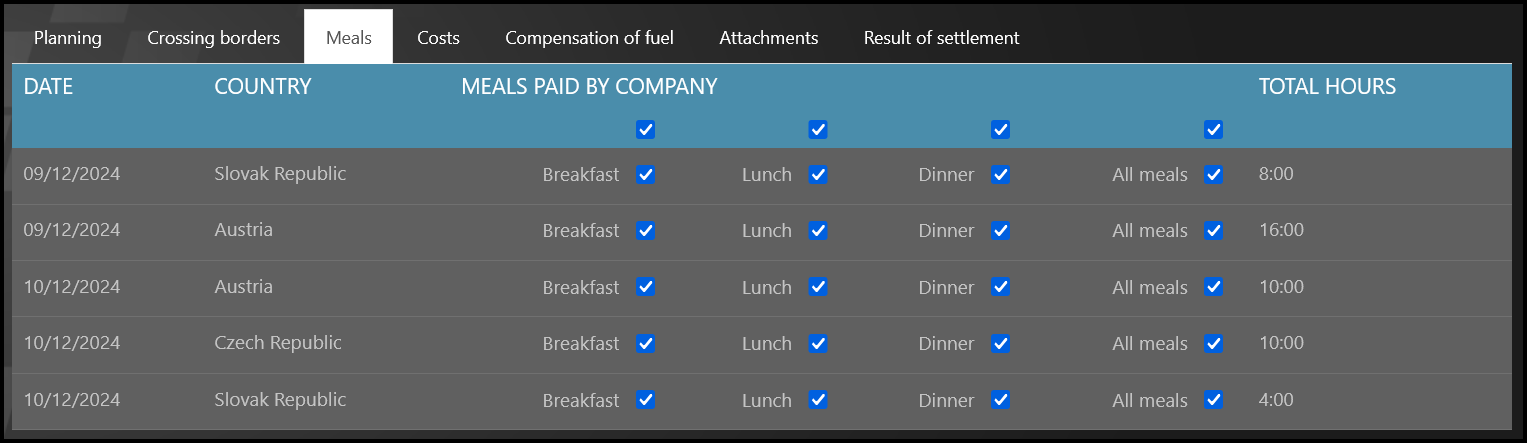
Click on next tab called Meals.
The checkboxes are ticked by default. This means all meals were paid by the company.
Uncheck any checkbox where the meals were paid by yourself.
Check the data:
- destinations – check if there are any gaps
- dates – if you visited more destinations during one day, you should see two (or more) lines with the same date but different locations.
- Keep checkboxes checked for meals that were paid by the company.
If two locations are visited during one day, each location´s meals must be filled in on a separate row.
If you forget to fill in this part of the BT, it will trigger an error warning.
Costs
Step 6 – Cost types
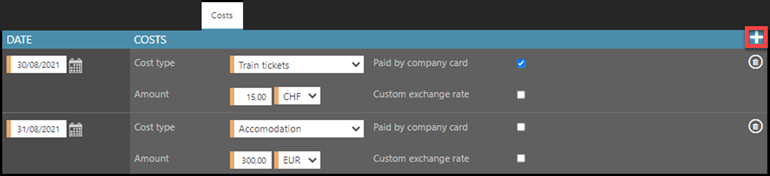
Click on next tab called Costs.
The costs section is one of the most important in the entire form. Submit all additional costs related to the business trip that should be paid by the company. Some Clients have automatically filled in planned costs into Costs section.
If you need more lines for multiple costs, click on a plus button to add an additional row.
Fill in details about each cost:
- Date
- Cost type – what did you pay for
- Amount
- Currency
- Paid by company card checkbox– if the amount was paid this way, mark an cost as “paid by a company card” and in that case, the amount of cost is deducted from the BT settlement result. Instead of this parameter, it is possible to set a list for selection (for example “paid by employee”, “paid by company card”, “paid by agency” etc.) and each cost will be divided by payment type.
Step 7 – Custom exchange rate

Custom exchange rate – Tick the custom exchange rate box if the cost was paid in a foreign currency, but the receipt or invoice is in the local currency.
Compensation of fuel
Step 8 – Car
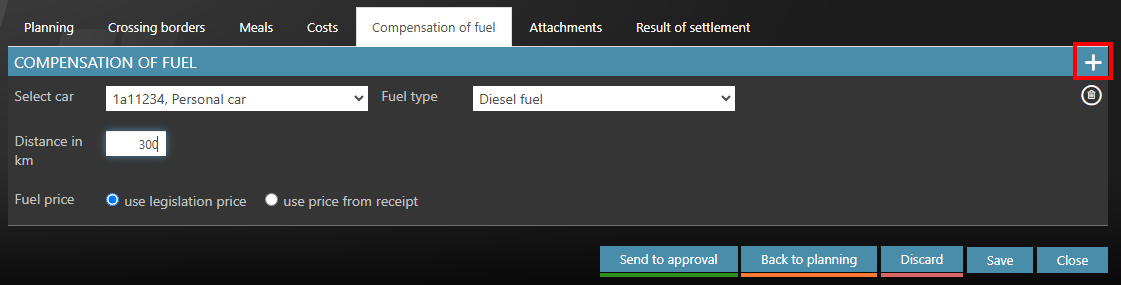
Click on the next tab called Compensation of fuel in case you used a private vehicle for the business trip purposes.
Fill in the details:
- Vehicle selection – choose a vehicle from the active cars in your profile or add a new vehicle. If your vehicle is not on the list yet, click on the Add new private car button and attach all necessary documents, for example insurance. In some cases, not only employees, but also accountants can add/edit private vehicles.
- Fuel type selection – choose a type of used fuel. You can only select out of fuel types that you have defined for your private car.
- Distance in km / mileage – number of km traveled by a private vehicle used for the business purposes.
- Fuel price – use the statistical price or click on the box use the price from the receipt.
If you used a private vehicle but did not entered any mileage (the mileage is 0) , it will trigger an error warning.
Hybrid vehicles – You can select one vehicle multiple times in one BT (if you drove part of the BT on electricity and the rest of the BT on diesel, for example) and divide the cost.
Step 9 – Fuel receipts

If you use the price from a receipt, you must have a receipt as a proof of fuel purchase.
- Enter the Fuel price per 1 liter in domestic or foreign currency
- Click on Add attachment and submit a copy of the receipt.
Attachments
Step 10 – Attachments

Click on next tab called Attachments.
All costs from the previous tabs in settlement form are pre-filled into this tab, you do not have to submit them again.
Submit only missing confirmations or specify any additional costs that are not submitted yet:
- Date – fill in the date of the purchase
- Type of cost – for example accommodation, tickets, insurance etc.
- Add attachment – submit any receipts, invoices, or bills for each registered cost.
The proof of the payment must be uploaded, otherwise, the cost cannot be accepted.
Result of settlement
Step 11 – Result of settlement
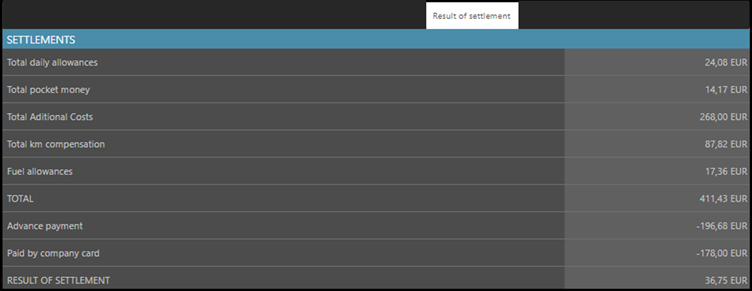
Finally, click on a Result of settlement tab.
Here, you can check the result of settlement immediately or download the summary in an XLS (MS Excel file) format.
Additional sum of various types of expenses can be displayed in the result of the business trip expense report (e.g. total transportation expenses, total accommodation expenses, total entertainment expenses, etc.).
Step 12 – Save / Approve / Discard

- Click on Approve button – It sends it to your manager for approval and to accountants for processing.
- You can Save the settlement and come back to it later. Access it via My Tasks tile.
- Click Reject to return the settlement into a plan.
- Click Discard to delete the form.
- Click Close to leave without saving changes.
Once the settlement is approved by a manager and processed by accounting department, you will receive an e-mail notification.
Download the file
Step 13 – Download
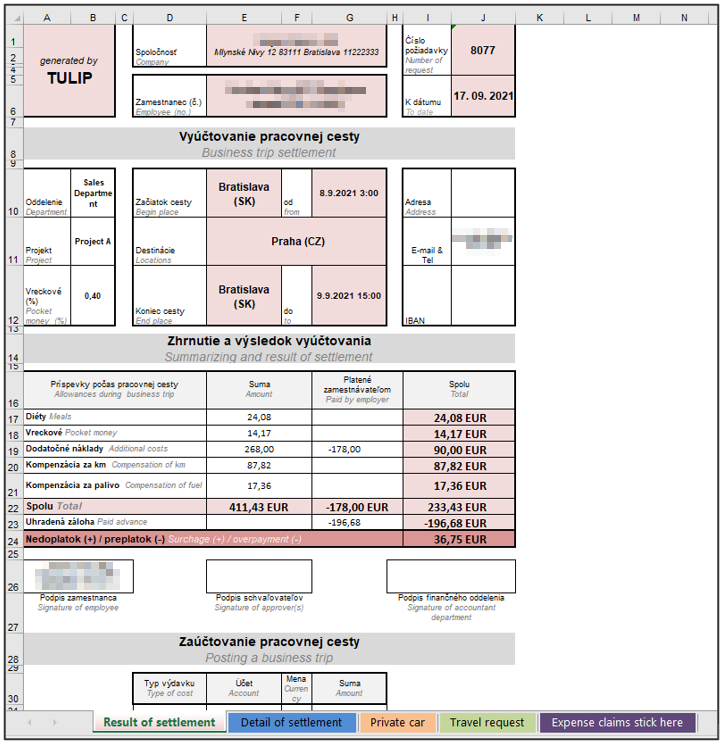
The Excel sheet It is divided into several spreadsheets:
- Result of settlement – total amounts.
- Detail of settlement – calculations and data for meal allowance and travel cost allowance
- Private car – calculations and data for compensation of fuel
- Travel request – details of the business trip plan and advance payment calculation
- Expense claims stick here – attached documents – receipts, bills, and so on.