
Introduction
The main tool of distributing working time in our Attendance modules are calendars that consist of workshifts.
Workshifts
Workshifts distribute the employee’s working time in one working day – usually one calendar day. Sometimes it is even necessary create new workshifts in order to make a desired calendar.
For example, a workshift for people working in the office from 8:00-16:30, with duration of 8h work + 0,5h break, can be set up for mandatory working time 10:00-15:00, allowed selectable working time 6:00-20:00. This setting allows the employee to have some flexibility in start/end, while also keeping the working time.
Calendars
Calendars allow the distribution of working shifts in a pattern during a short time period e.g. week, month, 90 days. It is necessary to create calendars (in this manual) from workshifts in order to assign it to employees.
For example, a calendar for people working in the office from Monday to Friday, 8:00-16:30, is set up for 1 week and consists of 5 shifts that take 8,5h from 8:00-16:30.
Adding calendars to employees
After creating workshifts, create calendars (in this manual) and lastly assign calendars to employees.
Calendars and workshifts are made by administrators, but it must be noted who receives which calendar afterwards (some of the managers also can change employee’s calendars).
Please note that only employees with special access rights can use functionalities to create calendars, shifts, or assign them to employees.
Frequently asked questions
It is my first time of creating a calendar, are there any template calendars?
There are no universal templates in TULIP administration available. Click here to see examples of Calendars.
Also, a few calendars are usually already created for your company. You can use that as a template for a new calendar. Go to ‘Attendance calendars’ tile, click on a calendar’s name to display details and use them as a guide.
How to create a Contractors’ calendar?
Add shifts that can be modified (the duration can be 0 or more hours) – go to this part of the manual to see more.
I cannot add a shift into a calendar.
Is there an issue with selecting a shift? Use the TAB key instead of your mouse to select a shift – go to this part of the manual to see more.
The shift you want to choose is not even displayed? Create a new shift first and then create the calendar using that shift.
Calendar
Step 1 – Settings

Go to Attendance Calendars tile.
Step 2 – Display calendars
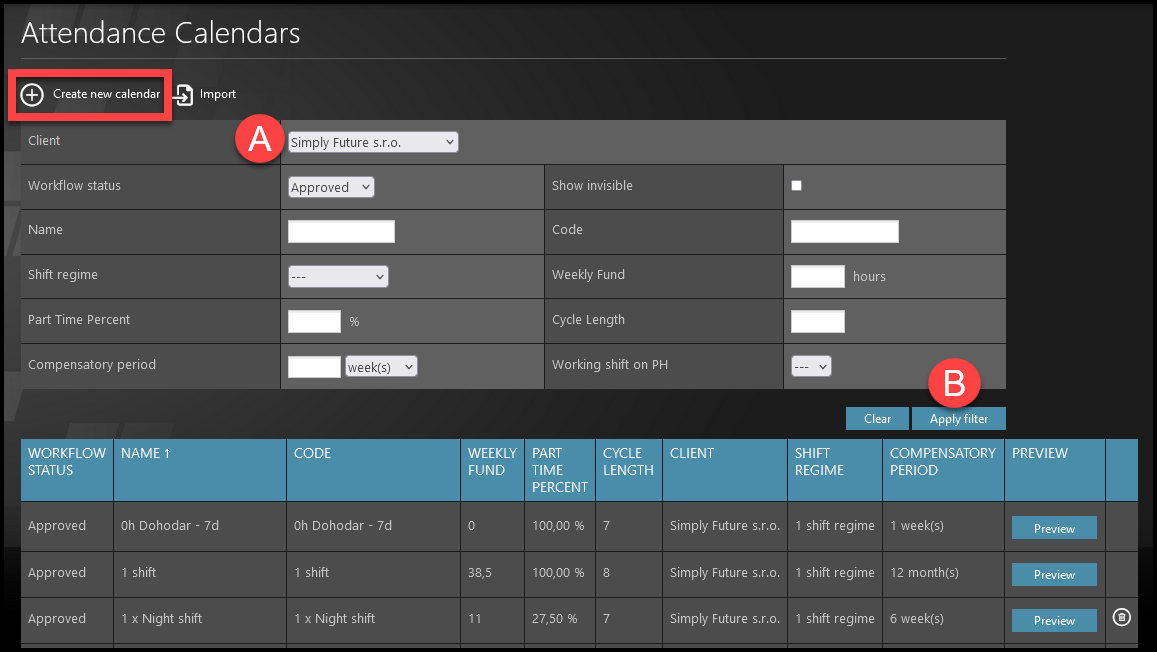
Please note that if you have access to more than just one company, you must first select the A) Client & click B) Apply filter to display approved calendars in the company.
Select + Create new Calendar.
In the list below you will see all approved calendars in the company.
It is possible to edit existing calendars, or just open the detail of an existing calendar and use it as a help for creating a new calendar
Preview – Shows you how the full calendar of shifts will look like. Select dates from & to to choose the time range. After closing the preview, the displayed calendar will be highlighted in a different shade of gray for better orientation in the list.

Step 3 – Create new
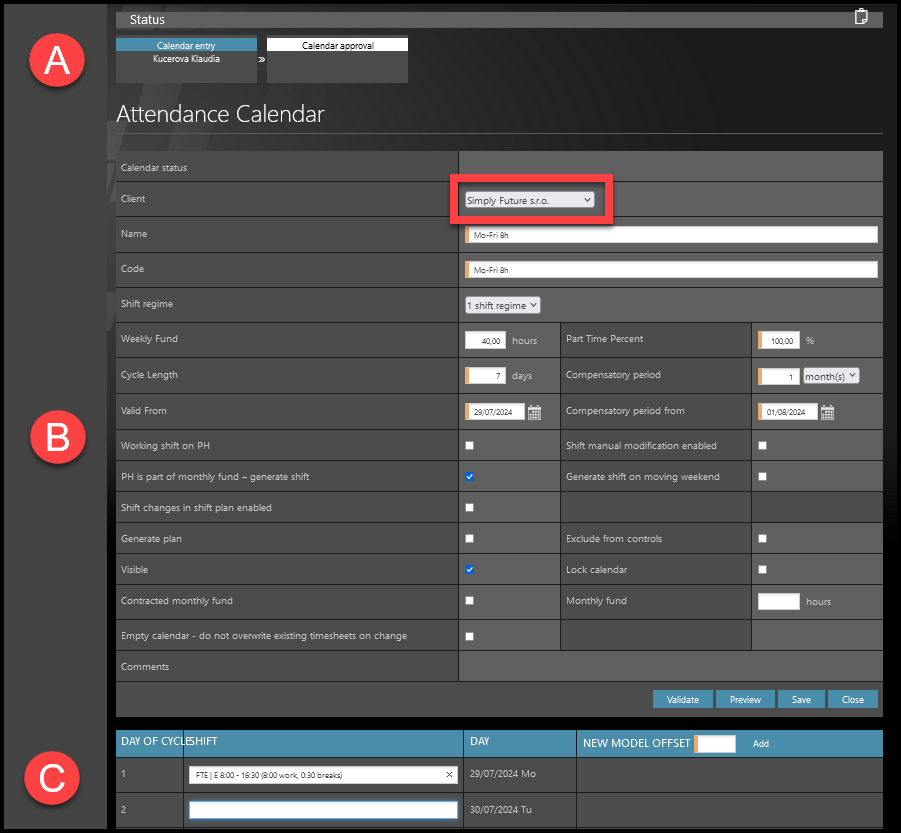
Select a Client. You must create calendars for each company that you can access individually.
The screen consists of 3 main parts:
A) Status – usually if an administrator creates a (valid) calendar, it is automatically approved and can be used immediately. Some companies can use the custom setup where a manager creates a calendar, and then TULIP sends it for approval to an administrator.
B) Settings – Set up the conditions and limits for a calendar. The fields with an orange stripe are mandatory – you can create & save a Calendar only if you fill in those fields.
C) Shifts – Add working days to the calendar. In this section, you can create an “Offset” of this calendar (used especially to create multiple calendars for shift workers).
– Examples of Calendars –
- 8h-long shifts, fixed time, evenly distributed from Monday to Friday
- 4h-long shifts on Mondays and Wednesdays only
- Calendars for contractors, so they can set up their real worked time (for example they will upload information that they worked on Monday 4hours , Tuesday 8hours, Friday 3hours & the other week Tuesday 6hours, Saturday 5hours….)
- Morning shifts 8:00-16:00 first week, Evening shifts 16:00-0:00 second week, Night shifts 0:00-8:00 third week
– Calendar settings (description) –
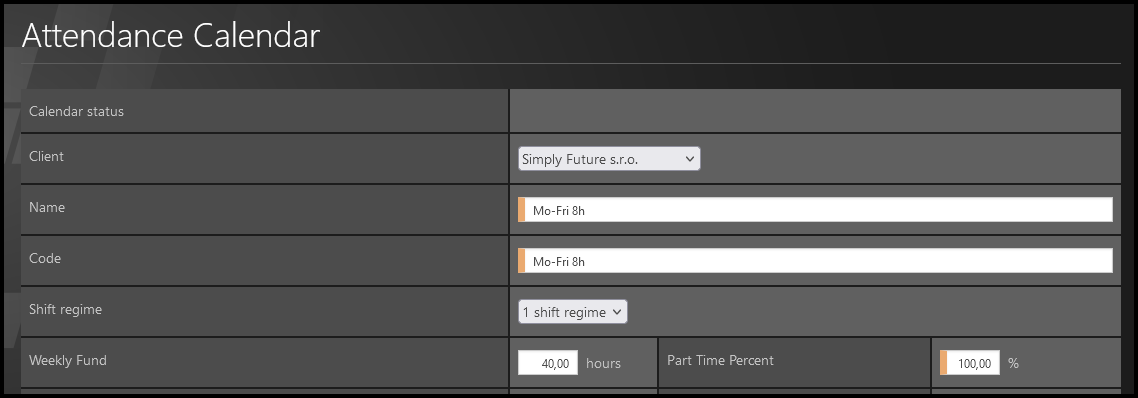
- Client / Company – If you have access to set up more than one company, you must first select a Client and create calendars for each company individually.
- Name – Name of the calendar can be longer (than code). Here are some name recommendations:
- Name calendars based on the length of a shift (8h, 2,5h, 6h etc.).
- For multiple shifts with the same length, you can also name calendars based on the start&end time (8:00-16:30, 7:30-11:30 etc).
- If the shift length varies every day, type different lengths of shifts for each working day in a pattern “Mo-Tue-Wed-Thu-Fri” (8-8-0-0-4 etc.)
- Name the calendar based on shift types (Mo-Fri Flexible, Contractors 5x0h etc.)
- Code – Code is usually shorter. This is the “Calendar code” that you should fill in the Excel sheet in bulk import of employees or import of changes.
- Shift regime – This parameter is connected to legislative controls in TULIP and other settings in calendar – for example, a required monthly or weekly fund may be different in a 1 shift regime, a 3 shift regime and a Contractors´ regime in your Country.
- Weekly fund – The amount of hours that must be fulfilled (worked or with absence/presence requests) in a week.
- Part time percent – Usually 40h are 100%, and part-time percentage is counted based on this amount. Many companies also use different amounts than 40h as 100% – for example 37,5h if the break of 30 minutes is subtracted from 8h working time, not added to it.

- Here is a table of examples of multiple hours worked – in case that the 100% fund is 40h per week.

- Cycle length
- How long is one calendar cycle (the duration of the template calendar – it will be used as a pattern for future distribution of shifts for employees with this calendar assigned to them)
- At the end of the cycle (after the 7th, 21st,…day), the distribution of shifts in a calendar start all over again.
- Keep this number as low as possible – you will need to assign a shift to each of the days.
- Examples:
- For regularly distributed working time on Mo-Fri, with free weekends, use 7 days.
- For shift workers who work in a 3-week shifts regime, use 21 days.
- Valid from
- This is the first day of availability of the calendar – an employee can use the calendar only after that date.
- We highly recommend to set up this date on Monday. The reason is that setting up shifts from that day is much easier than starting a calendar in the middle of the week.
- Examples:
- An employee started working one month ago and you need to assign him/her a new calendar. Set up the “Valid from” date at least one month ago (ideally the first Monday before the start date of an employee´s contract).
- An employee who should be working based on this calendar is starting work from the beginning of next year. You can set up the date on the closest Monday before 1st of January.
- Compensatory period
- Select either weeks or months from the drop-down menu.
- This period is a time during which an employee´s working time can vary on individual days. At the same time, the summary of worked hours must be correct and exact at the end of compensatory period.
- Examples:
- Employees who work with a consistent and fixed working time every week can have the compensatory period of 1 week.
- Employees with flexible working time can have a one-month-long compensatory period. This way, you can allow them some flexibility on individual shifts but still guarantee the hours worked will be checked with the monthly fund and are correct in order to close a monthly attendance.
- Employees with flexible working time – you can also select 3 months so the employees have more time to balance the working time.
- Compensatory period from
- The first day of compensation period. It can be different that “Valid from” date, or it can be the same date – all depending on the type of Compensatory period that you choose.
- Examples:
- The compensatory period is set up for 1 month. Set up the “Compensatory period from” date on the 1st day of the month.
- The compensation period is set up for 1 week. We recommend to set up that date on Monday.

Left row:
- Working shift on PH
- PH is a part of monthly fund – generate shift
- Used for most employees
- There are some differences in various legislation is countries (For SK&CZ, you will have to uncheck this box only in very rare situations).
- For example: if there is a shift planned on 25th December, the employee will have a shift on that day planned and it will be paid.
- It does not say whether the employee should or should not work (and have the PH paid without working) or work (usually with extra payment assigned for working on PH day).
- If you want to mark the PH as worked (worked and paid), keep this checkbox ticked and tick the Working shift on PH checkbox too.
- Shift changes in shift plan enabled – This parameter allows employees with Shiftplan to manually change their own shifts for another shifts.
- Generate plan + reality
- used in Store ShiftPlan
- if you check this checkbox, TULIP will generate a calendar where two parallel shift times are noted: a plan of shifts, and editable reality of shifts
- Visible – Visible/Hidden from displaying and being selected as a calendar for employees.
- Contracted monthly fund – Users with this calendar must fulfill a defined monthly fund every month. In the next field, fill in the number of hours.
- Empty calendar – When changing calendars, by default the previous one is overwritten by the new one. Tick the box to not overwrite other calendars when changing it.
Right row:
- Shift manual modification enabled – This parameter allows employees with Shiftplan to to manually edit their own shift times. Usually, those shifts become highlighted in a different color than the default/previous shift, and are also marked with an “M” letter instead of other abbreviations.
- Generate shift on moving weekend (Polish legislative) – If an employee´s allowed to change moving weekend shifts, it means that he/she can exchange some other day than a Public Holiday weekend shift for another shift. In that case, payments for both weekend and workday shifts usually remain the same, but the dates or shift order is going to change.
- Exclude from controls – Tick the box if the calendar should not be checked by local legislative control settings by TULIP.
- Lock calendar – Disable all users from making any changes in a saved calendar.
- Monthly fund – If you ticked the previous parameter, insert the exact number of hours here.
– Select shifts –

- Select shifts to fulfill hours per cycle / hours per week:
- First check whether the calendar starts with Monday – it may start with any other day, and then your selection of shifts must be adjusted. To change the starting day into Monday go to “Valid from” date.
- If you already created a calendar with incorrect shifts order for the days, you can also delete it (if no employee used it yet), and then create a new calendar.
- Type Shift name or Shift duration.
- All available shifts will display. In the brackets, you can see work duration and breaks duration. If the shift you need is not in the options – you must create a new shift.
- Click on the desired shift for each day worked.
- If the clicking does not work, please use your keyboard:
- Click on the blank field for shift selection with your mouse.
- Start typing the shift name.
- Use keyboard arrows (not your mouse) to select a shift.
- Press TAB key (do not click with your mouse) to confirm the selected shift.

Tab key
– Offset calendar –
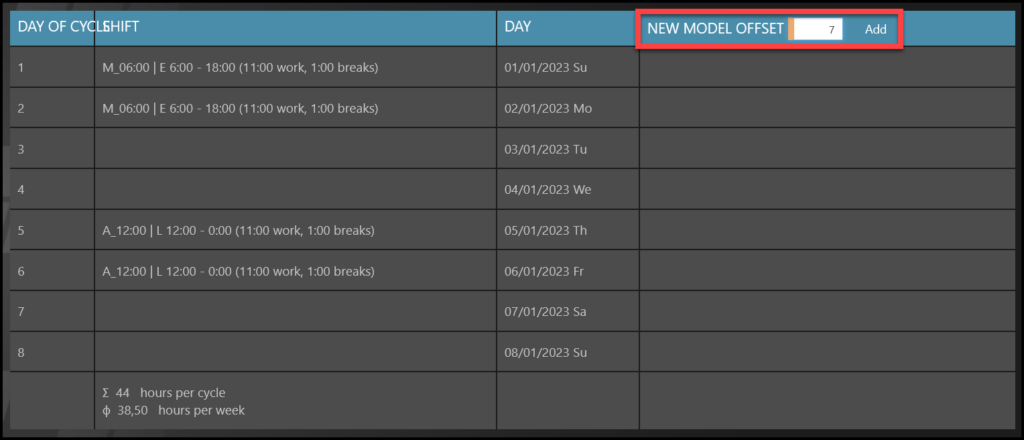
Offset is a copy of the same calendar with the same shifts. The only difference is that shifts will be starting from a different day or week. This setting is helpful for a quicker setup of shift workers’ calendars.
- Save the current calendar in case it is not saved. You can also create offsets of an already created calendar.
- Into the space next to New model offset, type the number of days.
- For example “2” means “plus two days” – the shift on Monday will start on Wednesday for the offset calendar.
- Number “7” means “plus one week”.
- Click Add.
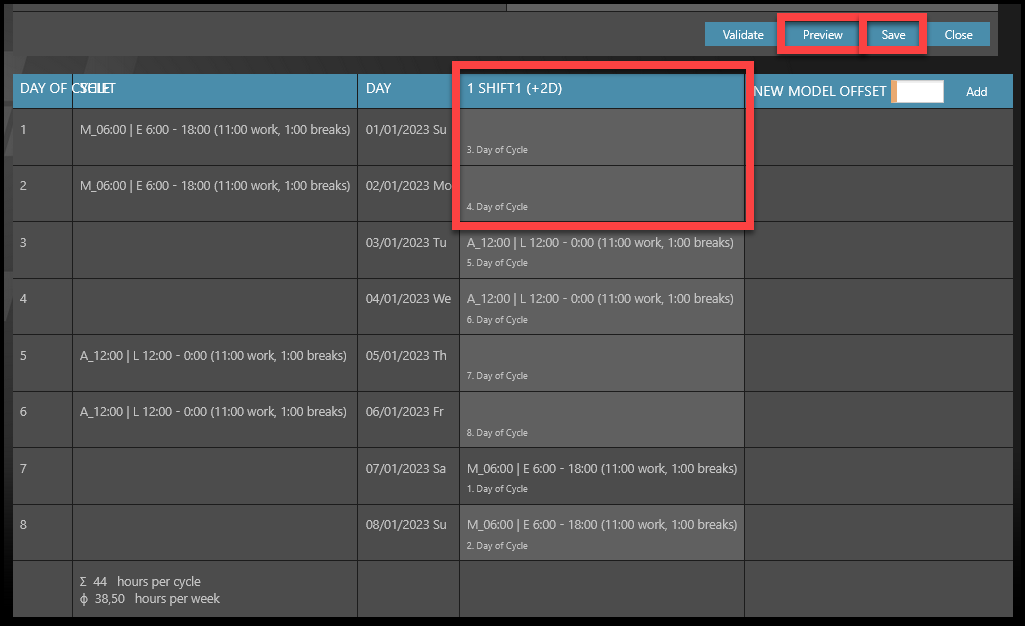
- The result displays in the next column (+2 days means the first day of offset calendar will be the 3rd day). It is possible to create more offsets than one.
- Click Preview button to check detailed list of shifts before saving,
- Click Save if you want to confirm the offset/s (if you do not click Save, it will be discarded).
– Flexible time & Contractors –
Choose a default flexible shift for every (only possibly) worked day. This setup allows employees to either skip, delete or add worked hours.
“No shift assigned” means no working (or editing of worked time) is possible.
Do not keep the fields blank if employees can choose to work on that day. The reason is that employees cannot “create a shift” if there is no default shift in a calendar. They can only “edit” existing flexible shifts.
Examples:
- For part-time workers that only work on Mondays and Wednesdays for usually 2-6 hours, add a flexible shift that lasts 4h only on Mondays and Wednesdays. They will be able to edit (add or delete) hours worked on those days (even to 0h in case they do not work at all on those days). They cannot add any extra shift on other days.
- For contractors that work occasionally a few hours per week, but it can happen anytime during the whole week including weekend, add 0h shifts for every single day including weekends.
- For flexible workers with default working time of 8 hours on Monday to Friday, add a flexible shift that will by default be 8h from Monday to Friday. This way, they can edit the length up & down (even to 0h in case they do not work at all on that day), but they will not be allowed to upload any weekend work.
Step 4 – Validate / Preview / Save
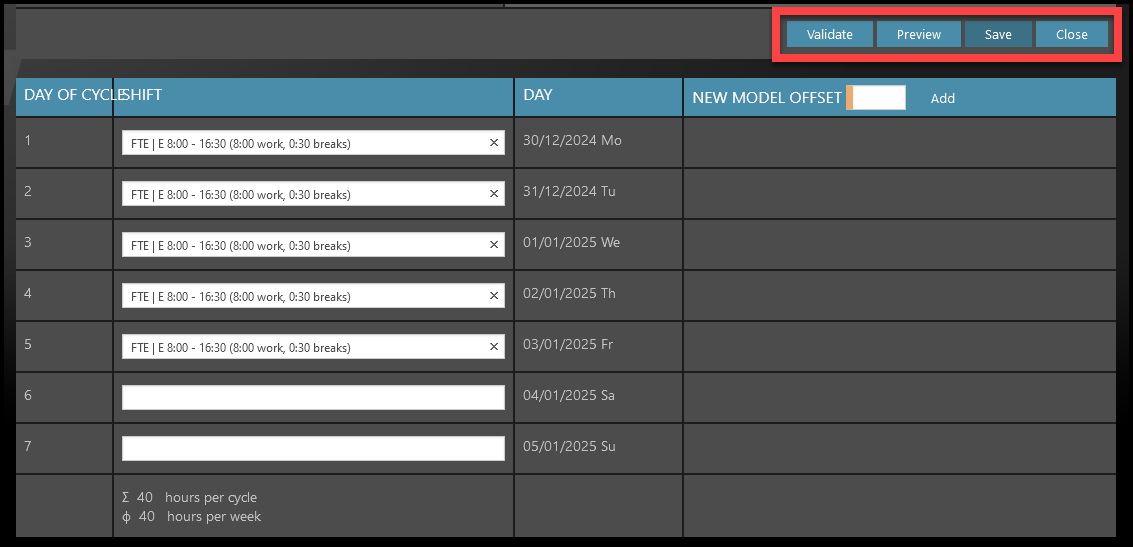
- Validate – Checks the calendar according to legislative controls in TULIP and shows you any errors that might pop up.
- Preview – Shows you how the full calendar of shifts will look like. Select dates from & to to choose the time range.
- Click Save to confirm all the settings and create a calendar. Do not forget to add calendars to employees (see the next step). Without adding a calendar to employee/s, no employee is working based on the new calendar.
- Close – All your changes will be lost if you click “Close” without “Save” first.
Add calendar to employees
Without adding a calendar to employee/s, no employee is working based on the new calendar. A change in calendars for an employee can be usually done only to those with an opened / unapproved attendance period (not locked by an HR Administrator). This is usually maximum of 1- 2 months into the past. Older data may be already processed by payroll, therefore calendar changes might not be possible.
There are a few ways how a calendar can be assigned to an employee:
A) Add a new employee – and then manually set up this calendar for the employee (go to attendance details section).
B) Change an employees´ calendar individually – manually set up this calendar for the employee (go to attendance details section).
C) Import of employees – use the “Calendar code” in the Excel sheet.
D) Import of changes – use the “Calendar code” in the Excel sheet.
E) Some Clients also use the functionality of a “Default Calendar“. All new employees receive a default calendar (both when created individually and in bulk import). This setup must be done by TULIP Administrators.