
Introduction
Managers or HR can create vacation requests, home office requests, sick day requests etc. on behalf of employees. In this manual, we will go through a Request import functionality. It allows managers to upload more requests at once (bulk import) using a file in an .xls format – a MS Excel template.
Please note a TULIP setup you see always depends on custom requirements and access settings of TULIP for your company. Not all companies use the Attendance or Import functionality.
Frequently asked questions
Who can create requests?
- Manager / HR Administrator can edit, delete, or create any type of request.
- Only HR Administrator with special access rights can be able to change the attendance of a terminated employee.
- Payroll accountant can make any changes to a closed attendance period & re-open the attendance period for Managers/HR, so they can edit the attendance themselves.
Steps
Step 1 – Tile

Go to My Attendance tile.
Step 2 – Import attendance requests
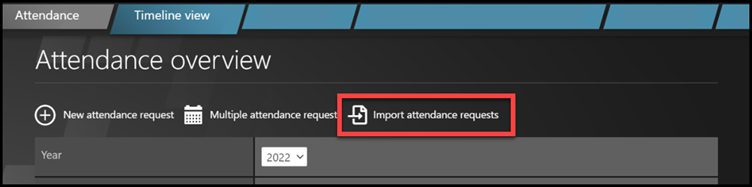
Click Import attendance requests.
Step 3 – Download a template
Choose Company.
Select the Import type: Attendance request import from excel.
Click on AttendanceImportTemplate.xsl to download the template.
Open the file in your PC.
Click Allow changes. Now you can choose to import:
- full day requests,
- half day requests
- request for a few hours of a day
A) Full day requests

- Personal number – in this column you must fill in the employee’s personal number.
For example, “11000210”
- Import code – enter the attendance activity code (according to a list of import codes).
For example, “WT”
- DateTime from – enter the request start date.
For example, FROM “24/8/22”
- DateTime to – enter the request end date.
For example, TO “25/8/22”.

- Start at 1st./2nd. halfday – do not enter anything for full days requests.
- End at 1st./2nd. halfday – do not enter anything for full days requests.
- Count (hours) – it is a control column only. Do not enter anything for full days requests. The important information is in DateTime from and to columns!
- Count (days) – it is a control column only. Do not enter anything for full days requests. The important information is in DateTime from and to columns!
- Comment – Optional. This comment will be inserted into the request description.
B) Half-day requests
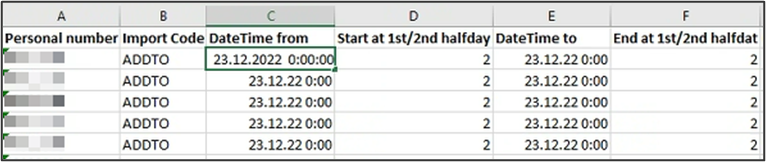
- Personal number – in this column you must fill in the employee’s personal number.
For example, “11000210”
- Import code – enter the attendance activity code (according to a list of import codes).
For example, “ADDTO”
- DateTime from – enter the request date.
For example, FROM “23/12/22”
- DateTime to – enter the request date.
For example, TO “23/12/22”.
- Start at 1st./2nd. halfday – Those two columns are used for half-day requests.
Enter 1 if it is starting in the first falf of the shift, 2 if it is starting in the second half of the shift.
- End at 1st./2nd. halfday – Those two columns are used for half-day requests.
Enter the same number as in the previous halfday column.
Enter 1 if the halfday request is happening in the first falf of the shift, 2 if the halfday request is happening in the second half of the shift.

- Count (hours) – it is a control column only. Do not enter anything for full days requests. The important information is in DateTime from and to columns!
- Count (days) – it is a control column only. Do not enter anything for full days requests. The important information is in DateTime from and to columns!
- Comment – Optional. This comment will be inserted into the request description.
C) Hours requests

- Personal number – in this column you must fill in the employee’s personal number.
For example, “11000210”
- Import code – enter the attendance activity code (according to a list of import codes).
For example, “WT”
- DateTime from – enter the request start date and time.
For example, FROM “24/8/22 8:00”
- DateTime to – enter the request end date and time.
For example, TO “24/8/22 14:00”.

- Start at 1st./2nd. halfday – do not enter anything for hours requests.
- End at 1st./2nd. halfday – do not enter anything for hours requests.
- Count (hours) – it is a control column only. The important information is in DateTime from and to columns!
- Count (days) – it is a control column only. The important information is in DateTime from and to columns!
- Comment – Optional. This comment will be inserted into the request description.
Step 4 – Upload a file into TULIP
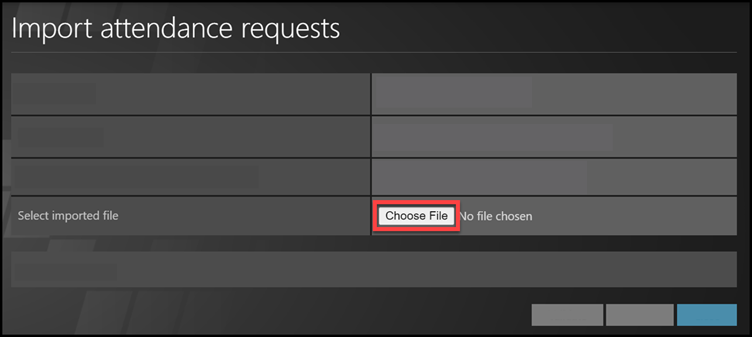
Save the file into your PC.
Go to TULIP.
Click Choose file.
Select the file from your PC.
Step 5 – Validation
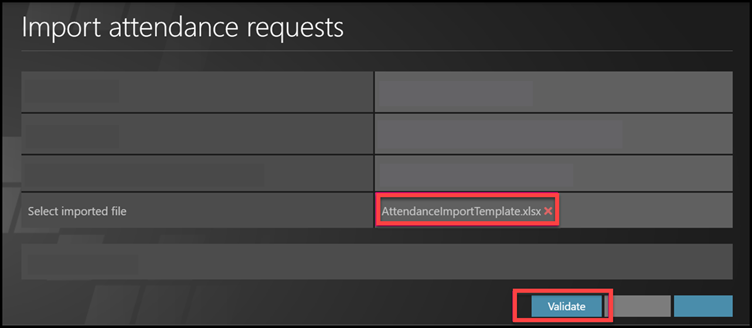
See the file´s name. Click Validate.
Step 6 – Status
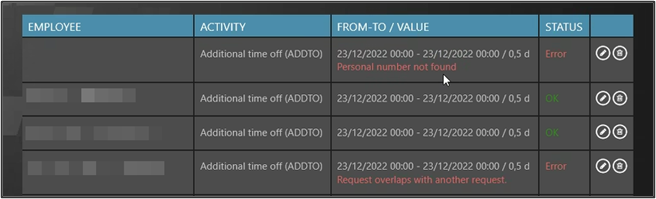
Rows with important information about validation:
- OK in green – the row is fine and will be imported
- Warning in orange – indicates an error in the import, but it is not so serious. See the description of error in the FROM-TO / VALUE column. You can import requests with this warning.
- Error in red – this row cannot be imported – therefore the Validate and Submit buttons are gray and not working now. See the description of error in the FROM-TO / VALUE column. You must edit or delete the row.
Step 7 – Edit or Delete rows
Edit or delete some rows: click on small icons on the right side.
Delete

Click on the bin icon.
Edit
Click on the pencil icon.

A new pop-up window displays.
Change dates or time.
Click Save and close.
Step 8 – Confirm
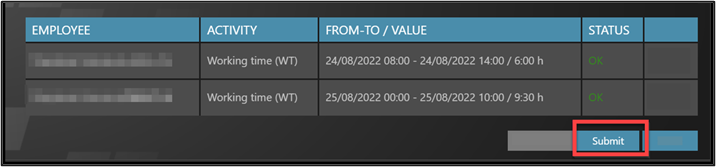
Click Submit.