
Introduction
Employees approve their own attendance period at the end of each month. Some companies use Timeline, others use Timesheet. In this guide, we will go over both ways to approve attendance. An employee’s attendance is typically sent to a supervisor for approval, then an HR Administrator closes and approves the attendance for the entire company. Finally, the Payroll department processes the data.
Please note a TULIP setup you see always depends on custom requirements and access settings of TULIP for your company. Not all companies use this functionality.
Frequently asked questions
I cannot close my attendance, the button is not working.
If you see a non-clickable, gray button, it usually means that some of your attendance requests (vacation, doctor, home office, etc.) for that month have not yet been approved by your manager. You can only close the period if all requests are approved (or rejected). Therefore please contact your manager.
I want to create an attendance request but the error message says ‘period is locked’.
The attendance period in which you are trying to add a request is already closed. Please contact your HR, in some cases it can be reopened for changes.
Steps
Step 1 – Tile
Go to My Attendance tile.
Step 2 – Timeline or Timesheet

Select Timesheet / Timeline view blue tile on top. Some Companies use Timeline view, some use Timesheets.
Timeline
Timesheet

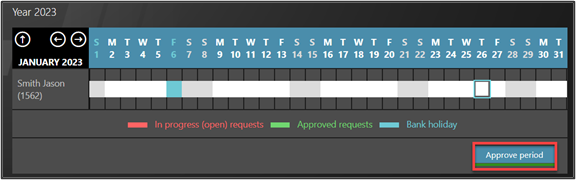
Step 3 – Approve period

Scroll down to the Approve period button.
If the button is not working (you will see a disabled, grey button), it usually means some of attendance requests are not approved by a manager yet. You can close the attendance period only if all requests are approved (or declined) by a manager. Contact your manager.
Once you click Approve period, your attendance period is confirmed and locked. Your manager will check, approve and send your attendance further to Payroll department.