
Introduction
Users in Client’s approval matrix can pair or also unpair assigned Orders & Invoices.
Please be aware that the allowed actions always depend on your individual access rights.
Frequently asked questions
Do all Orders need to be paired with Invoices?
It is not necessary to have an Order paired to every Invoice or pair an Invoice with every created Order. The decision is solely on the approver whether to pair them or not.
The Order was approved already, is it possible to have related Invoice automatically approved?
Yet, there is a custom setting possible that pairs Invoice that is imported into TULIP immediately with an Order. It skips Invoice workflow and goes from “Draft” status directly into an “Approved” or “Archived” status (if the client has default AREA in setup).
The Invoice & the Order can be automatically paired only if there is just ONE available (unpaired) approved Order with the same Partner (if there are more than one, the pairing must be manual by users).
PAIR Orders and Invoices
Step 1 – Tile
First, go to Invoice Approval tile. Here you will see all the available Invoices.
(NOT Orders tile. Pairing Orders and Invoices is made via Invoice view.)
Step 2 – Filters
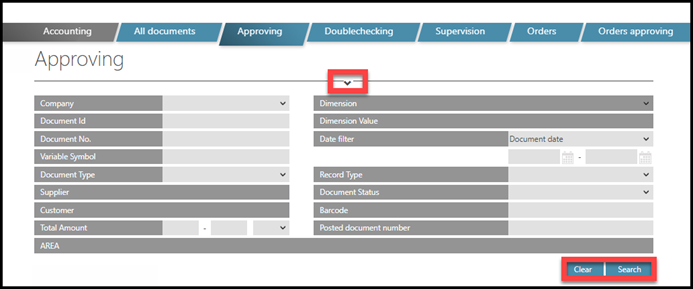
It is possible to use Filters to select only some of the Invoices:
- “v” icon – Display or hide filters by clicking on this icon on the top of the screen.
- Clear button– Clear filters.
- Search button– Apply filters.
FILTERS:
- Company – Users see Invoices of one or multiple companies based on their access.
- Document ID. – The identification number of the Order assigned by TULIP and is unique to the whole TULIP platform. No two Orders have the same ID number.
- Document no./Invoice no. – Is assigned during the creation of Invoice. It consists of a year and a 4-digit number (ascending from 0001 to 9999) automatically assigned by TULIP. Multiple companies can have Invoices with the same Document no.
- Variable symbol – A specific number related to the Invoice.
- Document type – (Purchase invoice, Sales invoice etc.)
- Supplier & Customer – First, select the Company. Start typing letters from the Supplier´s / Customer´s name and choose from the offer.
- Total amount – of the Order. You can select range “from” and “ to” and the currency.
- AREA – First, select the Company. Then, choose AREA (workflow and approvers).
- Dimension & Dimension value – Custom categories related to accounting (can be set up based on client´s needs, they are not necessary for each client).
- Date filter – Select from multiple choices (Import date, Received date, Due date etc.). Select the date range “from” and “to”.
- Record type – Manually uploaded document, Electronically scanned document etc.
- Document Status – Approved, Draft, Import, Correction etc.
- Barcode – Type the Barcode number of the Invoice.
- Posted document number – A number assigned to the Invoice in ERP system.
To apply selected filters, click Search button.
Step 3 – Open Invoice
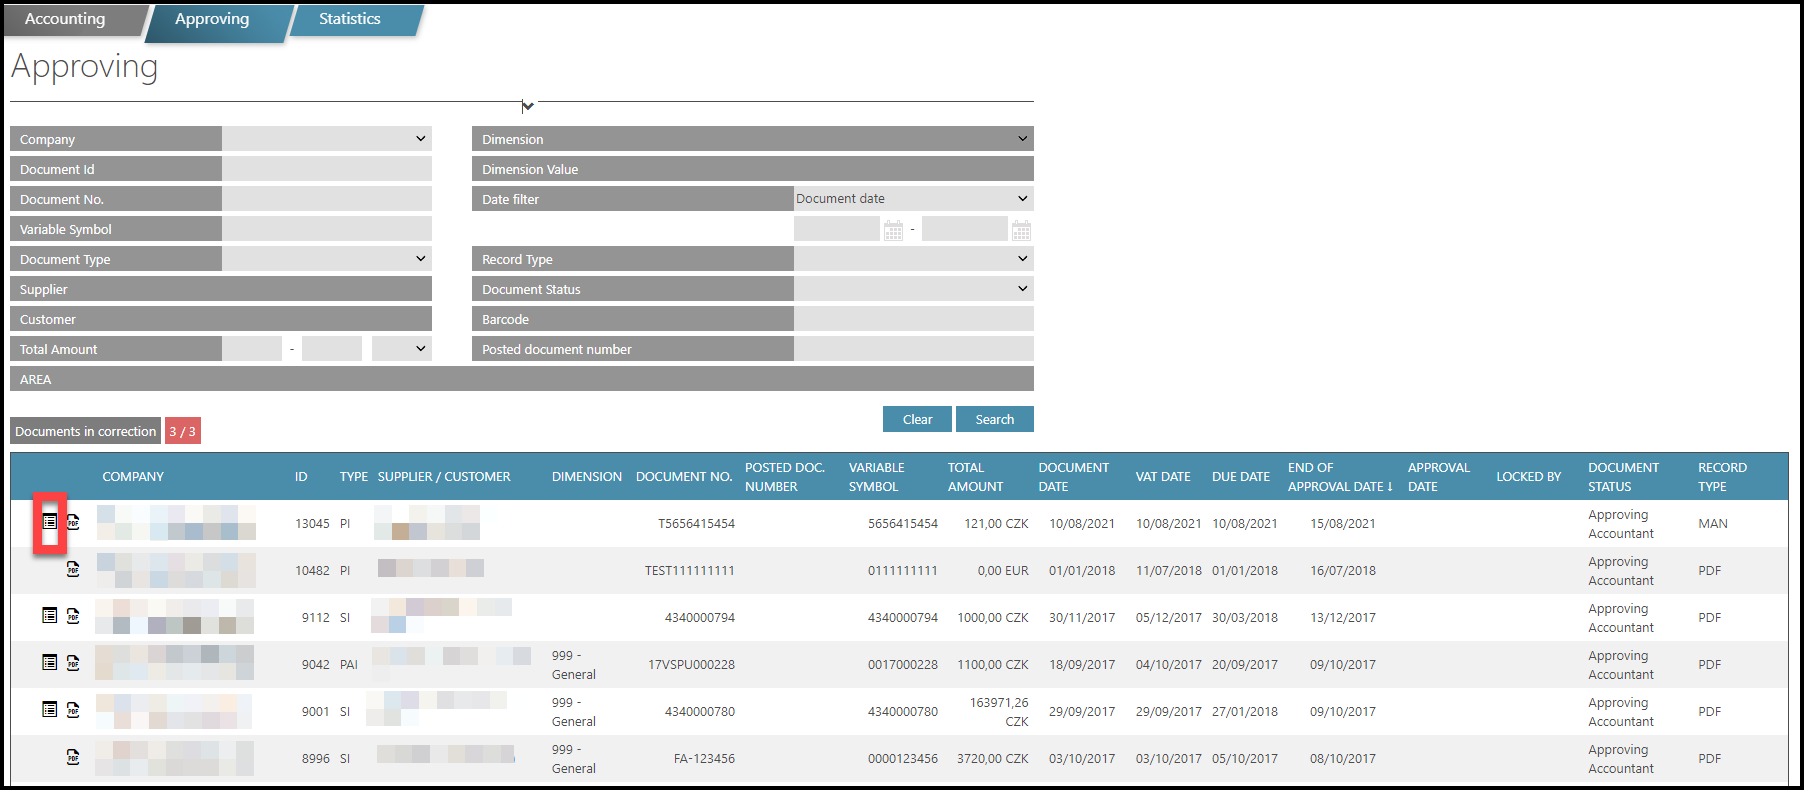
Click on the first icon on the left in the line to open the Invoice.
Step 4 – Add detail

If the Invoice is approved, click on the Add file detail icon.
Step 5 – Detail
A new window is displayed. This is where Invoices and approved Orders are paired.

- Into a Document number field, Start typing the Order number.
- Type minimum of 4 characters to display options.
- Then, select the correct Order Document number from options.

- You can only see and select from Orders that meet all 3 criteria:
- In an Approved status
- With the same Partner
- In the same Currency
- In case of partially paired documents: TULIP gives you information about both total & remaining amount. This way you can see the already paired amount and display and select another Order / Orders to cover remaining amount.
- For Orders with a zero-remaining amount (after pairing the Order & Invoice in full amount) the Order status is changed to “Archived” and this Order will not display in the list for pairing anymore.

- Click on the “+” icon to confirm and save changes. These data are automatically pre-filled from the paired Order:
- The Amount
- VAT rate
- Total amount
- AREA – After selecting an Order, the AREA (category that assigns workflow and approvers) from the Order is automatically filled in. You do not need to fill it in manually. It can be edited later, if desired.
Step 6 – Confirmation
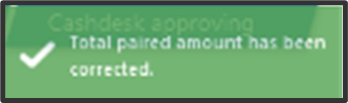
See a green note on the right side of the screen if the pairing was successful.
Step 7 – Next steps
Now you can choose from these next steps:

- Display details of the Order: Click on the “i” icon. A new window opens.
- Unpair the Order & Invoice: Click on the bin icon.
- Pair second Order to the same Invoice: If there is a remaining amount, it is displayed in the upper right corner between the Invoice and Order amounts. Search another (Order) Document number to pair with the same Invoice and again, click on the “+” button.
When all Orders are paired with the Invoice, close the window to save all data.
Step 8 – Confirmation
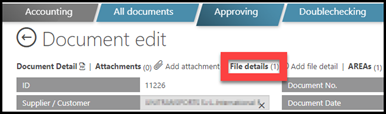
To check the saved data, see the number of paired Orders on top of the Document detail (in brackets) next to the File details button. For example, “File details (1)”.
Step 9 – Other details

You can also add an attachment, edit the pre-filled AREA, or add a comment (note).
- Comment: here you can insert a note that the next approver will see.
- Attachment: Insert a document that you wish to attach to the Invoice.
- AREA: Click on the AREA button and select from options. Please be aware that changing AREA in this point is available only to users with special access rights. The AREA change affects the workflow & changes approval steps.
Step 10 – Next steps
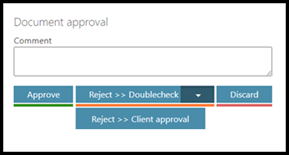
Approve – The changes you made in the document will be saved; you approve the correctness of the data. After pairing Order&Invoice in full amount, the Order status becomes “Archived”.
Reject
- Reject – Doublecheck – Return the Invoice to the beginning of the approval. It is possible to send the document back to Validation (The first step of OCR scanning / uploading the document manually into TULIP). You must add a comment.
- Reject – Client approval – Return the Invoice to previous approver. Use in case that you do not approve the correctness of the data. The document will be sent one approval step back (based on the approval matrix/workflow) for correction. You must add a comment.
Discard – The Invoice´s workflow stops and its status changes to “Cancelled”. The Invoice is still available for viewing in All Documents tab. You must add a comment. Some users may receive e-mail notification about discarded Invoices.
Comment – Please be aware that anything, that you type into the “comment” field will be saved even without you making any other action in the invoice approval process.
Step 11 – Document history
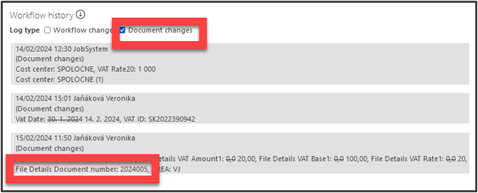
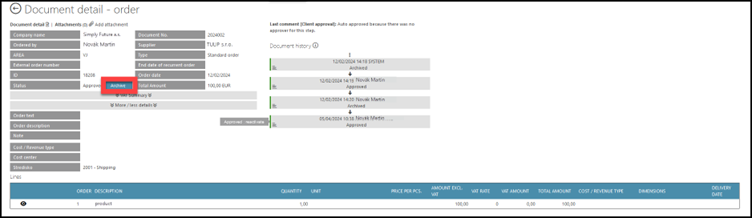
In Document history, users with access rights can see the Document number of paired Order / Orders and changes in status.
UNPAIR Orders and Invoices
Step 1 – Tile

Go to Orders tile.
(NOT Invoice Approval or Orders Approval.)
Step 2 – Filters
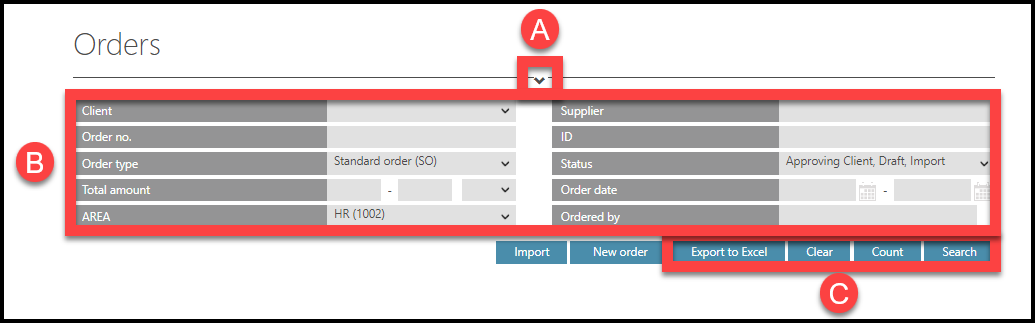
Select filters:
- Display or hide filters by clicking on the “v” icon on the top of the screen.
- Filters
- Buttons used for filters:
- Export to Excel – downloads a full sheet of displayed Orders. Downloads the sheet with most recently applied filters. To make sure which data are downloaded, click the button Search first to apply selected filters).
- Clear – clear filters.
- Count – displays the number of orders that are filtered.
- Search – apply filters.
Filters:
- Client – Users see Orders of one or multiple companies based on their access rights.
- Order no. / Document no. – A number assigned during the creation of Order. It consists of a year and a 4-digit number (ascending from 0001 to 9999) automatically assigned by TULIP. Multiple companies can have Orders with the same Order no.
- Order type:
- “Standard Order” type for most Orders
- “Recurrent Order” is a type usually used in repeating Orders. This type allows you to automatically duplicate an Order that should otherwise be created on a regular basis (for example every month). It can also be automatically paired with Invoices.
- Total amount – You can select range “from”, “to” and the Order currency.
- AREA – Categories that assign workflow and approvers.
- Supplier – Start typing letters from the supplier´s name and choose from the offer.
- ID – The identification number of the Order assigned by TULIP and is unique to the whole TULIP platform. No two Orders have the same ID number.
- Status:
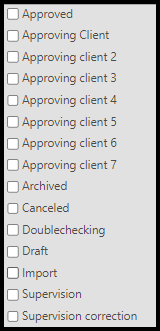
- Approved – all approval steps are finished successfully.
- Approving client (1 to 7 levels) – waiting for the client’s approval. The number of levels of approval is set up individually for each client. TULIP can show names of approvers in brackets (in Orders detail) to help identifying users better, for example: “Approving client 3 (John Smith)”.
- Archived – the Order is paired with an Invoice in Order´s full amount.
- Canceled – the Order was canceled at some approval level.
- Draft – the Order is being created. No workflow is started yet.
- Import – the Order returned for correction (from some approval step).
- Supervision – waiting for the creation of a new partner (supplier). If a supplier does not exist in the system yet, it is necessary to create a new one. Only users with a Supervision access role can create new suppliers.
- Supervision correction – an error occurred when creating a new partner. It must be corrected and then approved again.
- Order date – The date of creation. Click on the calendar & select range “from” & “to”.
- Ordered by – The user who created the order. Start typing letters from the user´s name and choose from the offer.
To apply selected filters, click Search button.

Step 3 – Order detail

Click on the first icon on the left in the Order line to display the Order detail.
Step 4 – Unpair
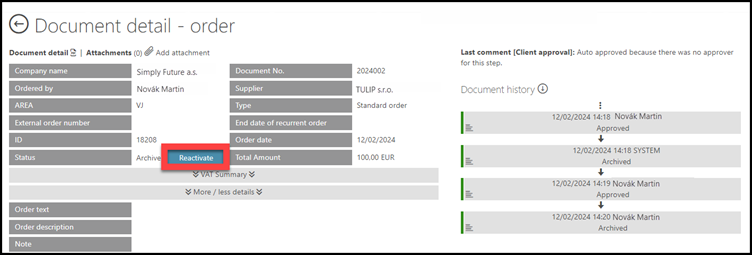
If the Invoice is approved, click on the Add file detail icon.
Step 5 – Comment
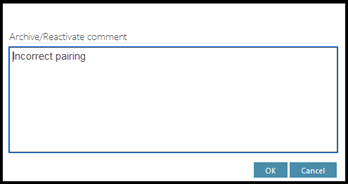
A new pop-up window displays. Add a comment / note. Click OK.
Step 6 – Status change
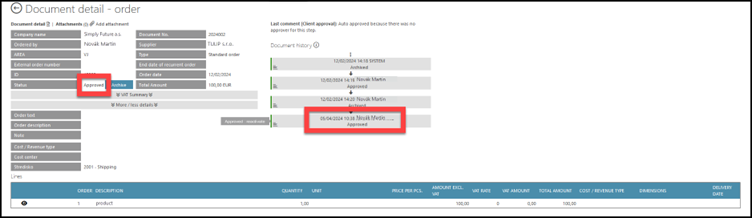
The status changes back from ”Archived” to “Approved”. It is also saved in the History.
Step 7 – Next steps
The approver with the correct access rights can now display the Invoice (for pairing to different Orders) again.
If you want to close the Order manually (it will not be offered in the process of pairing with Invoices), click on the Archive button. Use in case of:
- The paired Invoice never arrived
- Recurrent Orders